Proxmox
VE (Virtual Environment) bilindiği üzere; Debian tabanlı, açık kaynak
kodlu Hypervizor Tip 1 (Bare Metal) bir sanallaştırma aracı. Bu araç
ile ilgili detaylı bilgi için Proxmox VE adresini ziyaret edebilirsiniz.
Bu
dökümanda kurulumunu yaptığımız Proxmox VE tarafından bize gönderilecek
e-posta mesajlarının harici bir e-posta sunucusuna yönlendirilmesini
sağlayacağız.
13 Aralık 2017’de hayatını kaybeden Türkiye’de internetin yaygınlaşmasına öncülük eden önemli isimlerden biri olan Doç. Dr. Mustafa Akgül; ölümünün 4. yıldönümünde anılıyor. Bilindiği gibi, Doç. Dr. Mustafa Akgül, Linux Kullanıcıları Derneği’nin kurucularından ve onursal başkanıydı. 10 Mayıs 1948 tarihinde doğan Mustafa Akgül, 1970’te ODTÜ İnşaat Mühendisliği Bölümünden, 1974 yılında ODTÜ Matematik Bölümünden mezun oldu, 1981’de Waterloo University’den (Kanada) Kombinatorik ve Optimizasyon üzerine doktora derecesini aldı. ABD’de Delaware ve North Carolina State üniversitelerinde misafir öğretim üyesi olarak çalıştı. 1987’den itibaren Bilkent Üniversitesi öğretim üyesi olarak görev yaptı. Yurt dışında iken internet ile tanışıp kullanan Akgül, 12 Nisan 1993’te Türkiye internete bağlandıktan sonra ülkede internetin yaygınlaşmasına öncülük etti. İnternet konusunda basılı ilk Türkçe yayınlardan olan “İnternet: Bilgiye Erişimin Yeni Araç ve Olanakları”‘ adlı kitabı 1995 yılında yayımlandı.
İnternet Kurulu, Kamunet Teknik Kurulu, TOBB Sektör Kurulu ve Türkiye Bilişim Derneği yönetim kurulu üyeliği yaptı. 2000 yılında Linux Kullanıcıları Derneği’nin kurulmasının ardından ilk sekiz yılında yönetim kurulu başkanlığı görevini yürüttü. Derneğin Özgür Yazılım ve Linux Günleri (Şenliği), Akademik Bilişim Öncesi Kurslar, Linux Yaz Kampı etkinliklerinin öncüsü ve destekleyicisi oldu. Akgül Hoca, 13 Aralık 2017’de hayatını kaybetti.
In this article, I will show you how to set up Postfix as a send-only
SMTP server on Ubuntu 20.04, 18.04, 16.04. I will first show you how to
do it for a single domain, then you can apply the steps for multiple
domains if you need to.
Use Case
You have a website/web application that needs to send transactional
emails to users (such as password-reset email). Most likely, there’s no
need for users to reply to these emails, or if they reply, the reply
emails will be sent to your dedicated mail server. In this case, you can
set up a send-only SMTP server on the web server using Postfix, which
is a popular SMTP server software.
Prerequisites
In order to send emails from your server, port 25 (outbound) must be open. Many ISPs and hosting companies such as DigitalOcean block port 25 to control spam. I recommend using ScalaHosting,
because it doesn’t block port 25 (outbound). Once you have a
ScalaHosting server, install Ubuntu on it and follow the instructions
below.
Setting up Postfix send-only SMTP server for multiple domains isn’t
difficult actually. First, we need to configure it for one domain, then
set it up for multiple domains.
Step 1: Install Postfix on Ubuntu
Run the following commands to install Postfix from the default Ubuntu repository.
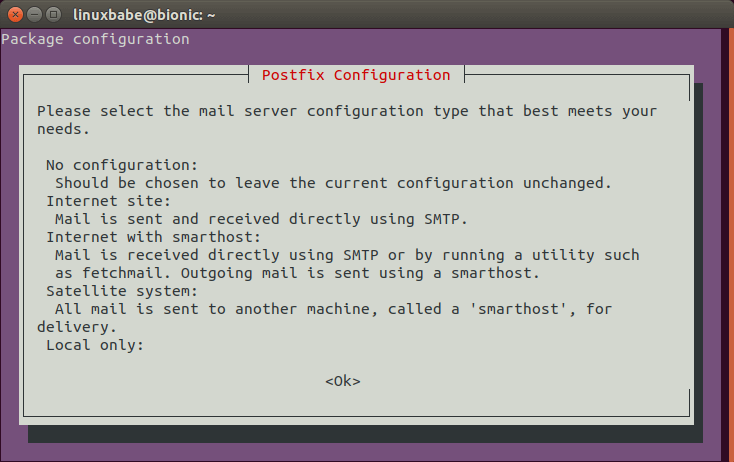
You will be asked to choose a mail server configuration type. Press the Tab key, then press Enter.
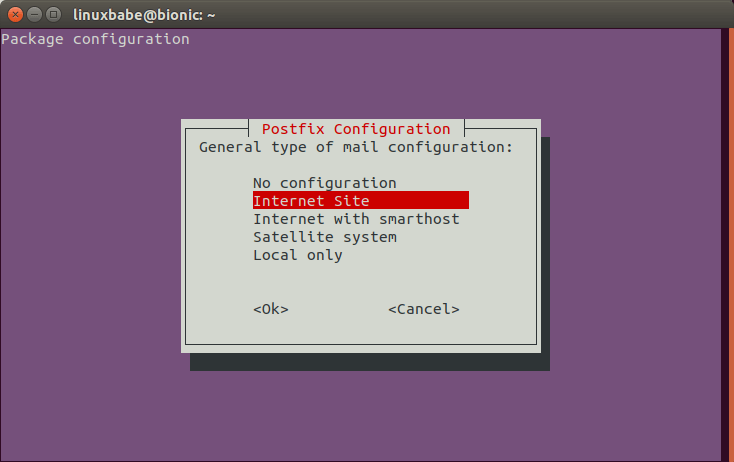
In the next screen, press Enter to select the default option: Internet Site.
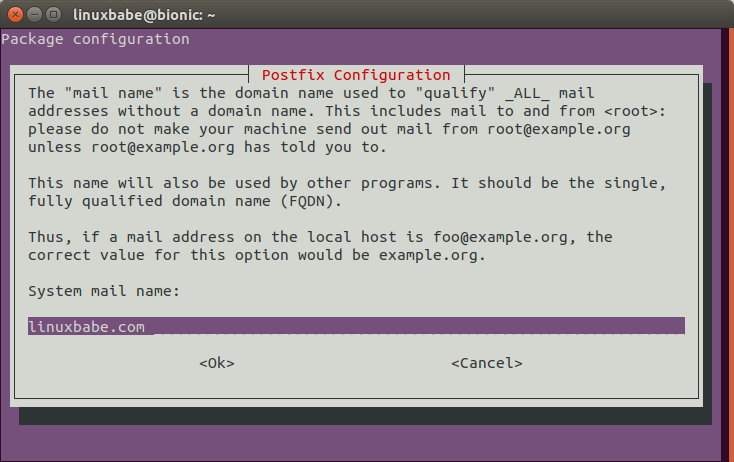
Next, enter your domain name for the system mail name, i.e. the domain name after @ symbol.
Step 2: Configure Postfix
Setting the Postfix hostname
By default, Postfix SMTP server uses the OS’s hostname to identify
itself when communicating with other SMTP server. However, the OS
hostname might change, and some SMTP servers will reject your email if
your hostname isn’t valid. So it’s a good practice to set the hostname
directly in Postfix configuration file with the following command.
This hostname should have a DNS A record pointing to the IP address of your server.
Setting $mydomain Parameter
The $mydomain parameter specifies the local internet domain name. The default is to use $myhostname minus the first component. You can display the current value of $mydomain with:
postconf mydomain
It should be your apex domain name, like
linuxbabe.com
If it’s not displaying your apex domain name, then set the $mydomain parameter with:
sudo postconf -e "mydomain = yourdomain.com"
Setting $myorigin Parameter
The $myorigin parameter specifies the default domain
name that is appended to sender and recipient addresses that have no
@domain part. The default is to use the value of in the /etc/mailname file, as can be seen with:
postconf myorigin
Output:
myorigin = /etc/mailname
Then you can display the value in the /etc/mailname file.
cat /etc/mailname
Its value should be yourdomain.com without any subdomain.
echo "yourdomain.com" | sudo tee /etc/mailname
Restarting Postfix
Finally, we need to restart Postfix for the changes to take effect.
sudo systemctl restart postfix
Step 3: Set PTR Record
You need to set a PTR record (aka, pointer record), which maps an IP
address to an FQDN. It’s the counterpart to the A record. Many SMTP
server will reject your email if your server’s IP address doesn’t have
PTR record.
Because you get IP address from your hosting provider or ISP, not
from your domain registrar, so you must set PTR record for your IP in
the control panel of your hosting provider, or ask your ISP. For
example, in ScalaHosting,
you can set PTR record by opening a support ticket or use the live chat
on their website. Although you can set PTR record to any hostname, for
best practice, you should use the Postfix hostname in step 2
To see if your PTR record is set properly, run the following command. Replace 12.34.56.78 with your own IP address.
host 12.34.56.78
Note that if your server uses IPv6 address, it’s also a good idea to
add AAAA record for your Postfix hostname and set PTR record for your
IPv6 address.
Step 4: Install and Configure OpenDKIM
DKIM stands for DomainKeys Identified Mail. You can install OpenDKIM
on your server and use it to add signatures to emails sent from your
domain, with your private key. Receiving SMTP servers verify the
signature by using the corresponding public key, which is published by
you in the DNS. Adding DKIM signature is a must if you want your emails
get into recipient’s inbox.
First install OpenDKIM from the default Ubuntu repository.
sudo apt-get install opendkim opendkim-tools
Then add postfix user to opendkim group.
sudo adduser postfix opendkim
Edit OpenDKIM main configuration file.
sudo nano /etc/opendkim.conf
Find the following lines.
#Canonicalization     simple
#Mode                 sv
#SubDomains           no
Uncomment them and replace simple with relaxed/simple. Change the mode from sv to s, because there’s no inbound email to verify signature.
Canonicalization     relaxed/simple
Mode                 s
SubDomains           no
Add the following lines at the end of this file. (On Ubuntu 18.04, the UserID is already set to opendkim)
#OpenDKIM user
# Remember to add user postfix to group opendkim
UserID             opendkim

# Map domains in From addresses to keys used to sign messages
KeyTable           refile:/etc/opendkim/key.table
SigningTable       refile:/etc/opendkim/signing.table

# A set of internal hosts whose mail should be signed
InternalHosts       /etc/opendkim/trusted.hosts
Save and close the file.
Create Signing Table, key Table and Trusted Hosts File
Add the following line to the file. This means that if the From: header in an email contains example.com, then use the sendonly DKIM selector. You can change sendonly to your preferred DKIM selector name and it should be unique in your DNS.
*@example.com sendonly._domainkey.example.com
Save and close the file. Then create the key table.
sudo nano /etc/opendkim/key.table
Add the following line. This means that for the sendonly DKIM selector, use the private key saved in /etc/opendkim/keys/example.com/sendonly.private to sign the email.
Save and close the file. Next, create the trusted hosts file.
sudo nano /etc/opendkim/trusted.hosts
Add the following lines to the newly created file.
127.0.0.1
localhost

*.example.com
The above means that messages coming from the above IP addresses and domains will be trusted and signed.
Generate Private/Public Keypair
We need to generate a private key to sign outgoing emails and a
public key for receiving SMTP servers to verify the DKIM signature.
Public key will be published in DNS.
The above command will create 2048 bits keys. -d (domain) specifies the domain. -D (directory) specifies the directory where the keys will be stored and we use sendonly as the selector (-s). Once the command is executed, the private key will be saved in sendonly.private and sendonly.txt will be the TXT record that contains public key.
The string after the p parameter is the public key. In your DNS manager, create a TXT record for the second domain. Enter sendonly._domainkey
in the Name field. Copy everything in the parentheses and paste into
the value field. Delete all double quotes. (You can paste it into a text
editor first, delete all double quotes, the copy it to your DNS
manager. Your DNS manager may require you to delete other invalid
characters, such as carriage return.)
Once the DNS record is published, enter the following command on your Ubuntu server to test your key.
If you see key not secure message, don’t panic. This is because DNSSEC isn’t enabled on your domain name.
Step 5: Connect Postfix with OpenDKIM
Postfix can talk to OpenDKIM via a Unix socket file. The default socket file used by OpenDKIM is /var/run/opendkim/opendkim.sock, as shown in /etc/opendkim.conf
file. But the postfix SMTP daemon shipped with Ubuntu runs in a chroot
jail, which means the SMTP daemon resolves all filenames relative to the
Postfix queue directory (/var/spool/postfix). So we need to change the socket file.
Edit the OpenDKIM main configuration file.
sudo nano /etc/opendkim.conf
Find the following line:
Socket local:/var/run/opendkim/opendkim.sock
Replace it with the following line. (If you can’t find the above line, then add the following line.)
Save and close the file. Restart OpenDKIM and Postfix.
sudo systemctl restart opendkim postfix
OpenDKIM won’t produce any message if it fails to restart. Run the
following command to check its status. Make sure it’s running.
systemctl status opendkim
Step 6: Create SPF DNS Record
SPF (Sender Policy Framework) record specifies which
hosts or IP addresses are allowed to send emails on behalf of a domain.
In your DNS management interface, create a new TXT record like below.
Use your own IPv4 address and IPv6 address of your server.
Step 7: Set the From Address, From Name and Return-Path
You can set custom From address, From name and Return-Path in your
website/web application. Let’s use WordPress as an example. You can add
the following lines in your WordPress theme’s functions.php file to override the default From address, From name and return-path. Replace the red text as necessary.
// Function to change From email address
function wpb_sender_email( $original_email_address ) {
    return 'notifications@linuxbabe.com';
}

// Function to change sender name
function wpb_sender_name( $original_email_from ) {
    return 'LinuxBabe';
}

// Set return-path the same as From address
function fix_my_email_return_path( $phpmailer ) {
    $phpmailer->Sender = $phpmailer->From;
}

// Hooking up our functions to WordPress filters
add_filter( 'wp_mail_from', 'wpb_sender_email' );
add_filter( 'wp_mail_from_name', 'wpb_sender_name' );
add_action( 'phpmailer_init', 'fix_my_email_return_path' );
Save the file and you are done. (Be careful about the functions.php file. Do not add an empty line after ?> at the end of this file, or your WordPress XML sitemap can be corrupted.)
Step 8: Enable TLS Encryption for Outgoing Emails
By default, Postfix doesn’t use TLS encryption when sending outgoing emails. To enable TLS encryption, open the /etc/postfix/main.cf file and add the following two lines at the end of this file.
smtp_tls_security_level = may
smtp_tls_loglevel = 1
The first line enables TLS encryption for the Postfix SMTP client. The second line will log the TLS connection in /var/log/mail.log file, so you can check if TLS encryption is working. Save and close the file. Restart Postfix for the changes to take effect.
sudo systemctl restart postfix
Since Postfix doesn’t receive incoming emails, there’s no need to configure a valid TLS certificate for the Postfix SMTP daemon.
Some SMTP servers require you to use TLS. If not, they will reject
your emails and you will see the following error message in the mail
log.
Must issue a STARTTLS command first
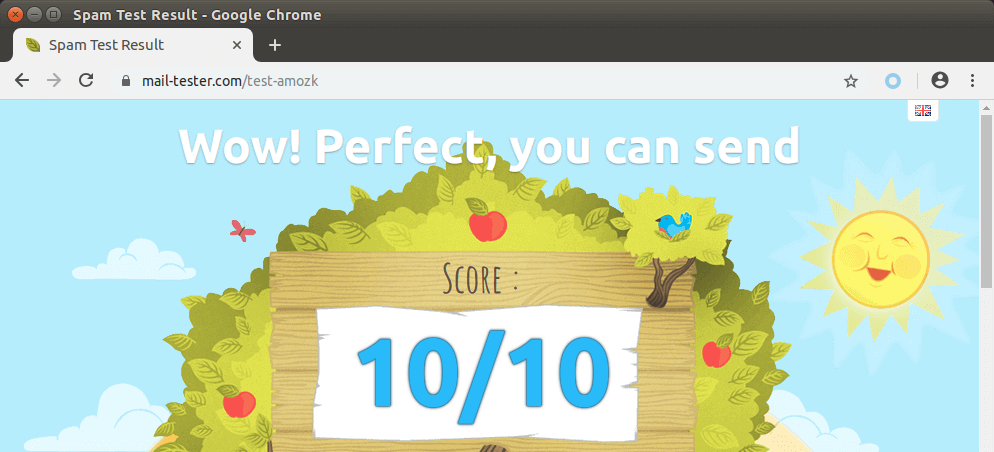
Step 9: Testing Sender Score
Now go to https://www.mail-tester.com.
You will see a unique email address. Send an email from your website on
the Postfix SMTP server to this address and then check your score. As
you can see, I got a perfect score. In the test result, you should check
if your PTR record, SPF and DKIM record is valid.
You can also open the /var/log/mail.log file to check if TLS encryption is used. For example, the following line shows the connection to mail-tester.com is encrypted.
Anonymous TLS connection established to mail-tester.com[94.23.206.89]:25: TLSv1.2 with cipher ADH-AES256-GCM-SHA384 (256/256 bits)
What if Your Emails Are Still Being Marked as Spam?
I have more tips on email deliverability for you in this article: How to stop your emails being marked as spam. Although it will take some time and effort, your emails will eventually be placed in the inbox after applying these tips.
How to Configure Postfix Send-only SMTP Server For Multiple Domains
By default, Postfix allows you to use any domain name in the From
header and return path address to send outgoing emails. If your server
hosts multiple websites, you just need to create SPF DNS record for your
other domains, which is very easy to do, and configure OpenDKIM for
your other domains.
To configure OpenDKIM for other domains, you need to add the other
domains in the signing table, key table and trusted hosts file like
below.
Then generate the DKIM Private/Public keypair
by following the same steps as mentioned above for other domains and
add the DKIM public key in DNS. Restart OpenDKIM and you are done. Don’t
forget to test your sender score.
Sending Emails From Another Server
There are two ways to allow other servers to send emails through your send-only Postfix SMTP server.
Use port 25 without SMTP authentication: This method requires the other server doesn’t block port 25 (outbound).
Use port 587 with SMTP authentication: If the other server blocks port 25 (outbound), you can use port 587.
Port 25 without SMTP Authentication
Run the following command to make Postfix listen on 0.0.0.0, so other servers can connect to the send-only Postfix SMTP server.
sudo postconf "inet_interfaces = all"
Then you need to add the IP address of the other server to the Postfix mynetworks parameter. Replace 12.34.56.78 with the real IP address.
Run the following commands to open port 25 (inbound) for the other server.
sudo ufw insert 1 allow in from 12.34.56.78 to any port 25 proto tcp
Now you can configure SMTP clients to use mta1.yourdomain.com and port 25 to send emails. You don’t need to specify username/password in the SMTP client.
Port 587 with SMTP Authentication
Open port 587 and 80 in firewall.
sudo ufw insert 1 allow in from 12.34.56.78 to any port 25 proto tcp
sudo ufw allow 80/tcp
Run the following command to make Postfix listen on 0.0.0.0, so other servers can connect to the send-only Postfix SMTP server.
sudo postconf "inet_interfaces = all"
Then you need to enable the submission service of Postfix so that the
email client can submit emails to Postfix SMTP server. Edit the master.cf file.
sudo nano /etc/postfix/master.cf
In submission section, uncomment or add the following lines. Please allow at least one whitespace (tab or spacebar) before -o.
In postfix configurations, a preceding whitespace character means that
this line is continuation of the previous line. (By default the submission
section is commented out. You can copy the following lines and paste
them into the file, so you don’t have to manually uncomment or add new
text.)
The above configuration enables the submission
daemon of Postfix and requires TLS encryption. Plain text authentication
will be rejected. The submission daemon listens on TCP port 587. STARTTLS is used to encrypt communications between SMTP client and the submission daemon.
Save and close the file. To enable SMTP authentication, we need to install Dovecot.
sudo apt install dovecot-core
Edit the authentication config file.
sudo nano /etc/dovecot/conf.d/10-auth.conf
Uncomment the following line.
disable_plaintext_auth = yes
It will disable plaintext authentication when there’s no SSL/TLS encryption. And if you want to use full email address (username@your-domain.com) to login, add the following line in the file.
auth_username_format = %Ln
Otherwise, you are able to login with username only (without @your-domain.com). Next, find the following line.
auth_mechanisms = plain
This line only enables the PLAIN authentication mechanism. LOGIN is
another authentication mechanism you probably want to add to support
older email clients.
auth_mechanisms = plain login
Save and close the file. Then edit the following file.
sudo nano /etc/dovecot/conf.d/10-master.conf
Change service auth section to the following so that Postfix can find the Dovecot authentication server.
service auth {
    unix_listener /var/spool/postfix/private/auth {
      mode = 0660
      user = postfix
      group = postfix
    }
}
Save and close the file. Restart Dovecot for the changes to take effect.
sudo systemctl restart dovecot
Next, we need to obtain a valid TLS certificate. We can easily obtain
a free TLS certificate from Let’s Encrypt. Issue the following commands
to install Let’s Encrypt client (certbot) on Ubuntu.
sudo apt install certbot
Then use the standalone plugin to obtain TLS certificate (assuming there’s no web server running on the Postfix SMTP server).
After a while, you should see the following lines which means the
certificate is successfully obtained. You can also see the directory
under which your cert is stored.
Next, we need to run the following two commands to specify the
location of TLS certificate and private key in Postfix configuration
file. Your Let’s Encrypt certificate and private key are stored under /etc/letsencrypt/live/sendonly.your-domain.com/ directory.
Now you can configure SMTP clients to use sendonly.yourdomain.com and port 587 to send emails. Use TLS encryption type and plain as authentication mode. You need to create email account on the SMTP server. That’s very simple. Use the adduser command to add a user.
sudo adduser user1 --no-create-home
Then set a password for this user.
sudo passwd user1
The email address will be user1@yourdomain.com.
Troubleshooting
Email not Signed by DKIM
If your message is not signed and DKIM check failed, you may want to check postfix log (/var/log/mail.log) to see what’s wrong in your configuration. If you see the following message in the mail log,
warning: connect to Milter service local:opendkim/opendkim.sock: No such file or directory
you may want to check if the opendkim systemd service is actually running.
systemctl status opendkim
If opendkim is running and you still see the above error, you might need to change smtpd_milters = local:opendkim/opendkim.sock to smtpd_milters = local:/opendkim/opendkim.sock in /etc/postfix/main.cf file.
Must Issue a STARTTLS Command First
If you see the following error in the mail log (/var/log/mail.log), it’s probably because the TLS certificate is not specified correctly in /etc/postfix/main.cf file.
Must issue a STARTTLS command first (in reply to MAIL FROM command))
fatal: no SASL authentication mechanisms
If you see the following error in the mail log (/var/log/mail.log), it’s probably because you forgot to restart dovecot (sudo systemctl restart dovecot).
warning: SASL: Connect to private/auth failed: No such file or directory
fatal: no SASL authentication mechanisms
Also, check if Dovecot is running.
sudo systemctl status dovecot
Sending Bulk or Mass Emails
Can you use this SMTP server to send bulk or mass emails?
Yes, but you should send bulk email to legitimate subscribers only,
that is to say, the recipients should have signed up for your mailing
list. You should never send spam (unsolicited bulk email), or you SMTP
server will surely be blacklisted. Before sending bulk email, I highly
recommended following the advice in this article: How to Stop Your Emails Being Marked as Spam.
Disable Receiving Email in Postfix
By default, Postfix SMTP server listens on all active interfaces on
the machine. Since the Postfix SMTP server is only used for sending
transactional emails to users, you can block inbound connection to TCP
port 25, so bad actors can’t send spam to it. Since we added the a
whitelist for port 25, legitimate users won’t be affected.
Removing Sensitive Information from Email Headers
By default, Postfix SMTP server will add a Received:
email header, recording the IP address of the client, which can leak the
IP address of your website (If it’s behind CDN). You can tell Postfix
to ignore it. Create a header check file.
sudo nano /etc/postfix/smtp_header_checks
Put the following lines into the file.
/^Received:/ IGNORE
Save and close the file. Then edit the Postfix main configuration file.
Save and close the file. Then run the following command to rebuild hash table.
sudo postmap /etc/postfix/smtp_header_checks
Reload Postfix for the change to take effect.
sudo systemctl reload postfix
Now Postfix won’t include that sensitive information in email headers.
Auto-Renew TLS Certificate
You can create Cron job to automatically renew TLS certificate. Simply open root user’s crontab file.
sudo crontab -e
Then add the following line.
@daily certbot renew --quiet
Save and close the file.
Conclusion
I hope this tutorial helped you set up a Postfix send-only SMTP
server on Ubuntu for multiple domains. As always, if you found this post
useful, then subscribe to our free newsletter to get more tips and tricks. Take care 🙂
Bilgi işlem yöneticilerinin en korkulu rüyası günün birinde
sunucularının çökmesi yada herhangi bir sebep sonucu erişilemez
olmasıdır. Onlarca telefon kuyrukta bekler, çökmenin travmasıyla
ömrünüzden birkaç yıl yemiş olmasına rağmen telefonda sakin sakin durumu
anlatmaya çalışırsınız ..
Yazılımsal bir çökme ise elinizde daha önceden almış olduğunuz disk
imajlarına güvenirsiniz ve dün geceki yedeğe. İmajı geri getirmeniz ve
yedekteki dosyaları restore etmeniz en iyi ihtimalle tüm gününüzü
alabilir. Eğer ki donanımınızda bir sorun oluştuysa durum daha vahimdir.
Kullandığınız server yerine bir server temin etmeniz gerekir ve imaj
dosyalarını bu servera yükleyemeyeceğinize göre(aynı donanım olmaması
durumunda) yeniden kurulum yaparsınız ve active directory olan bir
sistemde eğer ad yedekleri de çalışmıyorsa tüm terminalleri elle tekrar
domaine sokmanız gerekir ki bu durumda birkaç gün sistemi tam olarak
toparlayamazsınız.
Çökme bir kere başınıza geldiğinde aksiliklerinde üst üste geldiğini
görmek pek vaktinizi almaz. Son aldığınız imajın çalışmaması, active
directory system state yedeğinin sorun çıkarması(kesinlikle %100
güvenmeyin). Yedeklerin çok uzun sürede restore edilmesi vs..vs..
Kritik uygulamaların çalıştığı sistemlerde bu tür felaket
senaryolarına karşı cluster mimarisi kurulur. Sunuculardan birinin
çökmesi durumunda diğer sunucu görevi devralır ve sistem kesintisiz
çalışmaya devam eder(high availability) .
Diyelim ki 100-200 bilgisayardan oluşan bir sisteminiz var ve orta
ölçekli bir kuruluşsunuz. Active/Passive cluster mimarisini sisteme
kurmak istiyorsunuz, bunun için iki sunucu ve Fc-SAN donanımlarına
ödeyeceğiniz miktar 20-30 bin dolar arasındadır. Bu miktar birçok orta
ölçekli kurumun bütçesini aşacaktır.
Sunucularınızın ve datalarının yedeğinin alınmasını bir çökme
durumunda alınan yedekten herhangi bir sunucu donanımı ile sisteminizi
geri yüklemek ve bu işlemi en fazla 10 dk yapmak için aşağıdaki yöntemi
kullanabiliriz.
Mimarimiz şu şekilde.
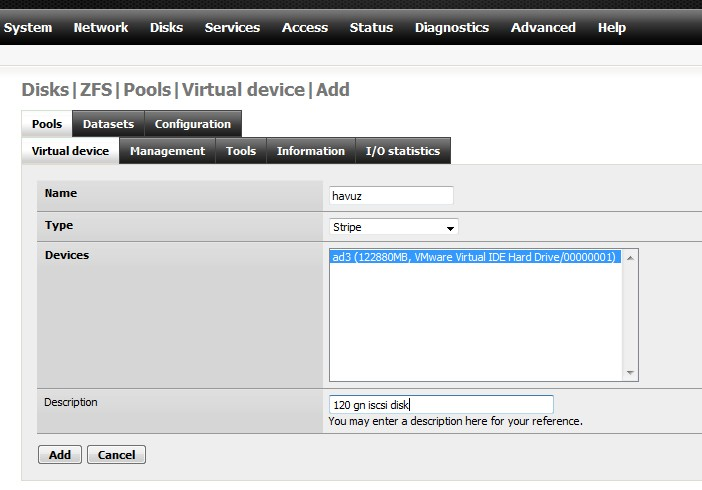
Bu mimaride vmware esxi(ücretsiz) ile sanal sunucuları kuracağız ve yedeklerini nas üzerine alacağız. Sistemin çökmesi durumlarda ise başka bir sunucudan nas üzerindeki server imajlarını attach ederek sistemleri çalıştıracağız. Tabiki nas tcp/ip üzerinden 1gbit bağlantı ile erişim yaptığından dosya yazma ve okumalarda yavaşlık olacaktır. 1. FREENAS KURULUMU Freenas ile iscsi protokolünü kullanarak bir SAN (Storage Area Network) kurulumu yapacağız. Freenas kurulumu yapılacak olan sunucu(ya da pc) disk okuma yazma performansı açısından değerlendirilmeli ve kullanılacak diskler buna göre seçilmelidir. “San ve Nas kavranları bazı durumlarda birbiriyle örtüşür hale geldi. Örneğin freenas NAS yönetim yazılımı, iscsi ise bir SAN protokolü. Bu nedenle oluşturduğumuz yapı esasında SAN dır.” 1. http://freenas.org/downloads adresinden uygun ortam dosyasını indirip freenas kurulumu yapalım. (Biz uygulamamızda vmware üzerine kurduk. 120 gb sanal disk alanı tanımladık.) 2. Freenas'a ip üzerinden erişelim. (ip adresi freenas kurulu sistemin konsolunda yazıyor).
3. Disk - Managment - Add Disk
4. Storage için kullanılacak Diski seçiyoruz. Preformatted file system den ZFS storage pool device seçiyoruz
Sonraki adımda Storage için bir isim belirliyoruz(Örn : exsan ) ve kurulumu tamamlıyoruz. Artık Vmware esxi sunucumuz oluşturmuş olduğumuz iSCSI - SAN veri deposunu /vmfs/volumes/exsan(storage ismi) olarak görecektir. Yedeklerimizi bu path üzerine aldıracağız. Vmware esx sürümünde vmotion tekniğini temel alarak sanal sunucu ve disklerimizi istediğimiz sunucuya taşıyabiliyoruz, çökme durumunda sunucular otomatik olarak storage üzerindeki imajları attach ederek çalışmaya devam ediyor ve fiziksel sunucular arasında yük dengeleme yapılabiliyor. Ancak başta dadediğimiz gibi lisans ücretlerinin fazla olması ve böyle bir yatırım yapamayacak olmamızdan dolayı biz esxi sürümü üzerinde çalışmakta olan bir sanal sunucunun online yedeğini nasıl alacağımıza bakacağız. Esxi kurulumunun yapıldığını ve sanal sunucuların kurulduğunu varsayarak devam ediyoruz.
1. Vmware karşılama ekranında Alt+F1 e basıyoruz. (Karşılama Ekranı için Alt+F2) 2. unsupported yazıyoruz 3. Parola bilgisini giriyoruz ve karşımıza konsol çıkıyor. (~#) 4. Online yedekleme için GhettoVCB.sh scriptini indiriyoruz. 5. ~# wget http://communities.vmware.com/servlet/JiveServlet/download/8760-49-32036/ghettoVCB.sh 6. # cat ghettoVCB.sh (Eğer ghettoVCB.sh içerisindeki satırların sonunda ^M karakteri varsa script çalışmayacaktır. Bu karakter windows new line'ı tanımlar.) 7. Şimdi Script içinde birkaç küçük değişiklik yapacağız.
# vi ghettoVCB.sh LAST_MODIFIED_DATE=11/14/2009 # vm sanal sunucu dosyalarının yedekleneceği yol. Oluşturduğumuz SAN' a yedekliyouz VM_BACKUP_VOLUME=/vmfs/volumes/exsan/vmyedek DISK_BACKUP_FORMAT=zeroedthick # Yedekleme geçmişi. VM_BACKUP_ROTATION_COUNT=3 # Yedek almadan önce sanal makineyi kapat. # 1=on, 0 =off POWER_VM_DOWN_BEFORE_BACKUP=0 Sadece bu değişikleri yapmamız yeterli 8. Dosyayı çalıştırılabilir yapalım. # chmod +x /vmfs/volumes/deppo/ghettoVCB.sh 9. Hangi sanal sunucuların yedekleneceği bilgisini vermedik. Bunun için bir dosya oluşturup yedeklenmesini istediğimiz sanal sunucu inventory isimlerini yazıyor. Windows 2003 Server Ent ve Freebsd 7.2 sanal sunucularımın yedeklenmesini istiyorum.
# vi yedek_liste Windows 2003 Server Ent Freebsd 7.210.
/etc/rc.local dosyasının sonuna aşağıdaki satırları ekliyoruz ve reboot ediyoruz. (Pazartesi-cumartesi arasında her gece 12 de yedek alacak) /bin/kill $(cat /var/run/crond.pid) . /bin/echo "0 0 * * 1-6 /vmfs/volumes/deppo/ghettoVCB.sh -f /vmfs/volumes/deppo/yedek_liste > /vmfs/volumes/deppo/ghettoVCB-yedek-\$(date +\\%s).log" >> /var/spool/cron/crontabs/root /bin/busybox crond
Eğer ki, cron yerine Windows altında zamanlanmış görev olarak yedekleme yapmak istiyorsanız vmware üzerindeki ssh servisini aktif hale getirip aşağıdaki adımları uygulamalısınız. 1. Ssh servisini aktif hale getirmek için :
2. http://the.earth.li/~sgtatham/putty/latest/x86/plink.exe adresinden programı indirelim 3. plink.exe dosyasını c:\ altına kopyalayalım ve aşağıdaki komutu çalıştıralım. Bu sayede vmware’e ssh ile bağlanıp yukarıdaki yedek alma komutunu giriyoruz. Plink’in güzel tarafı ise bunu tek satırda yapabilmemiz
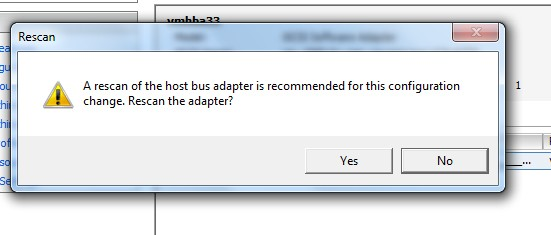
Artık bu komutu Windows altında zamanlanmış görev olarak çalıştırabilirsiniz. Yedekleme işlemi bittikten sonra başka bir sunucuya Vmware esxi kurulumu yapıp, oluşturduğumuz iscsi targetı ekleyebilir ve buradaki yedeklenen dosyayı attach ederek herhangi bir felaket anında sistemin diğer sunucudan çalışmasını sağlayabiliriz.
Yedek Sunucumuz : esxi2 esxi2 de Storage Adapter ve iscsi storage eklenmiş durumda iken Freenas üzerindeki sanal sunucu dosyasını attach ediyoruz(Add Ito Inventory) ve windowsumuz artık yeni sunucuda çalışıyor.
Herkese merhabalar. Bir çok kere yerel geliştirme ortamımızdaki
geliştirmeleri sunum halinde takım arkadaşlarınız veya müşterilerle
paylaşma gereği duymuşuzdur. Bugün bunu yapmanın en pratik yollarından
birinden bahsedeceğim.
Örneğin yerel de localhost:8000 de yayın yapan Django projenizi
direkt internet üzerinden erişilir hale getirmek ve bir yerlere deploy
etmekle uğraşmak istemiyorsunuz. O halde gelin evimizi dış dünyaya
açalım
Ngrok nedir?
Ngrok herhangi bir Firewall veya NAT arkasında koşan
yerel sunucumuzu tünelleyerek internete çıkartmamızı sağlayan reverse
proxy yazılımıdır.
Kurulum ve gerekli ayarlamalar.
İlk olarak Ngrok yazılımını bilgisayarımıza indirmemiz gerekmekte. Şu adresten
sizin için uygun olan versiyonu indirebilirsiniz. İndirme işlemi
tamamlandıktan sonra indirdiğiniz dizine zip dosyasını çıkartın.
$ unzip /path/ngrok/file
Daha sonrasında bir token’e ihtiyacımız var. Ngrok
ücretsiz kullanıma izin verse de ücretsiz planlarda bir sınırlama var.
Dakikada kabul ettiği istek sayısı, tünellenebilecek port sayısı vs.
Ayrıca token oluşturulmaz ise bağlantı sınırlı süreyle açık
kalmakta.(8saat) Token istemiyorum diyorsanız bu aşamayı
atlayabilirsiniz.
Bu adresten kayıt olabilir ve dashboard da auth sekmesinden tokeninizi oluşturabilirsiniz.
Tokeninizi kopyaladıktan sonra:
$ ./ngrok authtoken <YOUR_AUTH_TOKEN>
konfigürasyonumuzu tamamlıyoruz.
Port tünelleme.
Çalışan bir lokal sunucunuzun portunu tünellemek için (ex 8000)
./ngrok http 8000
Belirtilen adreslere bir kaç istek yaptığınızda terminalin altında loglanmaya başladığını göreceksiniz.
Ayrıca gelen isteklerin detaylı bilgilerini görebileceğiniz bir inceleme aracıda 4040portundan yayın yapmaya başladı.
Örnek request-response döngüsü.
$ curl https://f3e01cc7.ngrok.io
<h1>Hello world and Ngrok tunneling!</h1>
Kullanıcı adı parola korumalı port tünelleme.
Kolayca davetsiz misafirleri engellemek için auth sistemi kurmak.
$ ./ngrok http -auth="username:password" 8000
$ ./ngrok http -auth="egundogdu:123" 8000
Son olarak Ngrok gerçekten hayat kurtaran pratik bir araç. Daha fazla bilgi için dökümantasyon ve ücretli versiyonlarında ne gibi olanaklar sunuyor diye ücretlendirme sayfasına göz atmak isteyebilirsiniz. Herkese iyi günler!