Postfix 3.0 versiyonuyla gelen randmap özelliği sayesinde her table
lookup sorgusundan rasgele bir dönüş gelir. Örneğin 3 adet değeriniz var
diyelim ve her sorgulamada bir değer rasgele seçilir. Biz de bu yapıyı
kullanarak tek bir sunucu üzerinden ama farklı ip adreslerinden eposta
göndereceğiz ve bu sayede bedava eposta hizmeti sunan sistemlerin günlük
eposta alma limitlerine takılmayacağız.
Ayrıca bu randmap özelliğiyle yük dengeleme de yapabilirsiniz.
randmap: Her tablo sorgusundan rasgele sonuçlar döndürür.
#Kurulum Öncesi
Gerçek sunucu ip adresi : 192.168.1.230

Sanal Ip 1 : 192.168.1.231

Sanal Ip 2 : 192.168.1.232

Sanal Ip 3 : 192.168.1.233
#Kurulum
1. master.cf dosyasına ekleyeciğimiz ip adresleri /etc/network/interface dosyasında vip olarak tanımlanır.
iface enp6s1:0 inet static

      address 192.168.1.231/24

iface enp6s1:1 inet static

      address 192.168.1.232/24

iface enp6s1:2 inet static

      address 192.168.1.233/24
Interfaceler ayağa kaldırılır.
ifup enp6s1:0;ifup enp6s1:1;ifup enp6s1:2
2.vim /etc/postfix/master.cf dosyasını açıp aşağıdaki satırları kendinize göre düzenleyin ve kaydedin.
relay1 unix - - n - - smtp

  -o smtp_bind_address=192.168.1.231

  -o smtp_helo_name=mail1.deneme.org

  -o syslog_name=relay1

relay2 unix - - n - - smtp

  -o smtp_bind_address=192.168.1.232

  -o smtp_helo_name=mail2.deneme.org

  -o syslog_name=relay2

relay0 unix - - n - - smtp

  -o smtp_bind_address=192.168.1.230

  -o smtp_helo_name=mail0.deneme.org

  -o syslog_name=relay0

relay3 unix - - n - - smtp

  -o smtp_bind_address=192.168.1.233

  -o smtp_helo_name=deneme.org

  -o syslog_name=relay3
3. vim /etc/postfix/main.cf dosyasına asağıdaki 2 satırı ekliyoruz.
Postfix allows you to store virtual alias maps in a text file,
which tells postfix how to route virtual email addresses to real users on the system.
This setting and the file location is determined in the postfix configuration file /etc/postfix/main.cf like so:
virtual_alias_maps = hash:/etc/postfix/virtual
The format of the file is with the alias on one side, and the destination on the other, for example like so:
john_smith@example.com john
john-smith@example.com john
fred@example.com john
This routes all email addressed to john_smith@example.com,
john-smith@example.com and fred@example.com to the real user (or system
alias) john. It's possible to have a catch-all alias :x which will route
anything addressed to @example.com to a particular user like so:
@example.com john
If you wanted everything to go to "john" except for mail to fred@ then you can do it like this:
@example.com john
fred@example.com fred
Just editing the /etc/postfix/virtual file is not enough to make the
changes take affect. You must run the postmap command to make postfix
read the file, like so:
/usr/sbin/postmap /etc/postfix/virtual
This creates a new file called /etc/postfix/virtual.db and the aliases are now loaded into postfix.
If you want to use a more fine-grained model you can choose to relay the outbound traffic for domains over separate users.
This allows you to apply different settings per domain, but also provides the enduser access to their own logfiles.
Create sasl_passwd file for the individual outgoing user(s):
kodu çalıştırdıktan karşımıza yükleme ekranı çıkıyor. burada size bir
kullanıcı oluşturmanızı isteyecek. devam ettikten sonra sistemi
kurduğuna dair bir geri dönüş veriyor.
Bundan sonra oluşturduğumuz
kullanıcı ile sisteme giriş yapıyoruz. Ayarlarımızı yaptıktan sonra
artık bir mail serverımız oldu :D
[alert title=UYARI" icon="info-circle"]
E-posta gönderebilmeniz için 25 portunuzun açık ve erişilebilir olması gerekili.
[/alert]
root@battalgazi:~# grep www.openspf.net /var/log/mail.log Jun 24 01:03:49 battalgazi policyd-spf[10618]: 550 5.7.23 Message rejected due to: SPF fail - not authorized. Please see http://www.openspf.net/Why?s=helo;id=microsoft.com;ip=94.102.15.233;r=<UNKNOWN> Jun 24 01:03:49 battalgazi postfix/smtpd[10552]: NOQUEUE: reject: RCPT from server.wegagroup.com[94.102.15.233]: 550 5.7.23 <caylak@truvalinux.org.tr>: Recipient address rejected: Message rejected due to: SPF fail - not authorized. Please see http://www.openspf.net/Why?s=helo;id=microsoft.com;ip=94.102.15.233;r=<UNKNOWN>; from=<gates@microsoft.com> to=<caylak@truvalinux.org.tr> proto=SMTP helo=<microsoft.com> Jun 24 01:13:57 battalgazi policyd-spf[12010]: 550 5.7.23 Message rejected due to: domain owner discourages use of this host. Please see http://www.openspf.net/Why?s=mfrom;id=gates@gmail.com;ip=94.102.15.233;r=<UNKNOWN> Jun 24 01:13:58 battalgazi postfix/smtpd[11837]: NOQUEUE: reject: RCPT from server.wegagroup.com[94.102.15.233]: 550 5.7.23 <caylak@truvalinux.org.tr>: Recipient address rejected: Message rejected due to: domain owner discourages use of this host. Please see http://www.openspf.net/Why?s=mfrom;id=gates@gmail.com;ip=94.102.15.233;r=<UNKNOWN>; from=<gates@gmail.com> to=<caylak@truvalinux.org.tr> proto=SMTP helo=<smtp.gmail.com> Jun 24 01:17:30 battalgazi policyd-spf[12674]: 550 5.7.23 Message rejected due to: domain owner discourages use of this host. Please see http://www.openspf.net/Why?s=mfrom;id=finansmerkezi03@aol.com;ip=94.102.15.233;r=<UNKNOWN> Jun 24 01:17:30 battalgazi postfix/smtpd[12599]: NOQUEUE: reject: RCPT from server.wegagroup.com[94.102.15.233]: 550 5.7.23 <caylak@truvalinux.org.tr>: Recipient address rejected: Message rejected due to: domain owner discourages use of this host. Please see http://www.openspf.net/Why?s=mfrom;id=finansmerkezi03@aol.com;ip=94.102.15.233;r=<UNKNOWN>; from=<finansmerkezi03@aol.com> to=<caylak@truvalinux.org.tr> proto=SMTP helo=<smtp.aol.com> root@battalgazi:~#
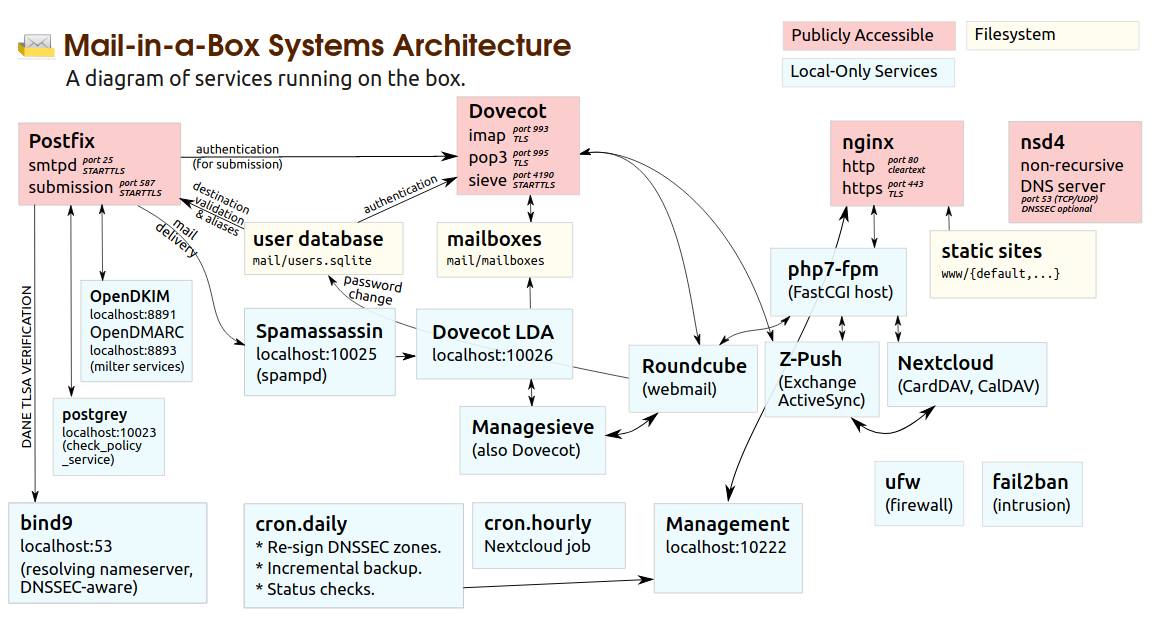
How to Install a Mail Server with PostfixAdmin on Ubuntu 20.04
In this tutorial, we’ll be covering the process of setting up a mail
server with Postfix, Dovecot, Postfixadmin and MariaDB on an Ubuntu 20.04 VPS. But first, what is PostfixAdmin?
PostfixAdmin
is an open-source web-based application written in PHP that’s used to
create virtual domains and email accounts for a Postfix mail server.
Using PostfixAdmin, we can manage mailboxes & aliases, set quotas,
configure vacation/out-of-the-office messages, and more. Plus, the
web-based interface gives you the user-friendliness of a browser window
with a UI.
PostfixAdmin allows us to use virtual email addresses and virtual
mailboxes, so we do not need to create a new system user account for
each email address. Considering all of these details, PostfixAdmin is a
versatile tool and can be used for almost all of your mailing needs.
This tutorial goes quite in-depth and may take some time to configure
everything properly. Let’s get started with the installation steps.
Hardware/Software Requirements
An Ubuntu 20.04 server or VPS with root access enabled, or a user with sudo privileges. We provide all of our users will full root access on their VPSes.
Postfix mail transfer agent (MTA) and Dovecot IMAP/POP3 Mail Delivery Agent need to be installed.
A database server (MySQL/MariaDB, PostgreSQL or SQLite) needs to be installed.
Apache web server needs to be installed with the mod_rewrite module enabled.
PHP 7.1 or greater must be installed with the imap, mbstring and mysql extensions all enabled.
Step 1. Getting Started
To begin, we’re going to need to log into our server using SSH. You can do that by entering this command:
ssh root@IP_Address -p Port_Number
Remember to replace “root” with your username if you are not using the root user. Change the values in red
according to your server’s IP address and SSH port number (the default
number is 22, so try that first unless your server uses a custom port
number).
Once you are logged in, you should update all of your packages to their latest available versions.
apt-get update -y
apt-get upgrade -y
Once all the packages are up-to-date, restart your server to apply
the configuration changes and ensure that all software is running on
their latest versions.
Step 2. Create a System User Account
PostfixAdmin has the ability to create multiple virtual domains,
users and aliases. This saves us the hassle of having to create new
system users whenever we need a new email account added. For security
reasons, we will create a new user named ‘vmail’ with permissions to
store the emails in the /var/vmail directory:
Step 3. Install PHP, Apache and Required Extensions
PHP 7.4 and Apache2 are included in the default Ubuntu repository for
20.04. We can install Apache 2, PHP 7.4 and the required PHP extensions
using the following command. We also included the required PHP and
Apache modules in the command:
PostfixAdmin requires a database in order to be able to store the
email account and domain information. For the purpose of this tutorial,
we will use a MariaDB database system, an open-source version of MySQL
that maintains feature parity. We can install the MariaDB server using
the following command:
Start the MariaDB service and enable it to start on server boot using the following commands:
systemctl start mariadb
systemctl enable mariadb
In order to improve the security of your MariaDB installation, run the mysql_secure_installation script:
mysql_secure_installation
When prompted, you can set the MariaDB root password and safely answer ‘Y’ to all questions.
Enter current password for root (enter for none): Just press the [Enter] key since there is no default password
Set root password? [Y/n]: Y
New password: Enter a strong password
Re-enter new password: Repeat the same password from before
Remove anonymous users? [Y/n]: Y
Disallow root login remotely? [Y/n]: Y
Remove test database and access to it? [Y/n]: Y
Reload privilege tables now? [Y/n]: Y
If you followed the above steps, then you will have a password set for the MariaDB root user.
Run this command to access the MySQL console:
mysql -u root -p
And enter the root password you set previously using the mysql_secure_installation script. If you chose not to run that script, there is no password set, so you just need to press the [Enter] key once.
Next, create a MariaDB user and database for PostfixAdmin:
MariaDB [(none)]> CREATE USER 'postfixadmin'@'localhost' IDENTIFIED BY 'Strong_Password';
MariaDB [(none)]> CREATE DATABASE postfixadmin;
MariaDB [(none)]> GRANT ALL PRIVILEGES ON postfixadmin.* TO 'postfixadmin'@'localhost';
MariaDB [(none)]> FLUSH PRIVILEGES;
MariaDB [(none)]> \q
Do not forget to replace ‘Strong_Password‘ with a good and unique password.
Step 5. Install Postfix
Install Postfix and postfix-mysql packages by running the command below:
apt-get install postfix postfix-mysql
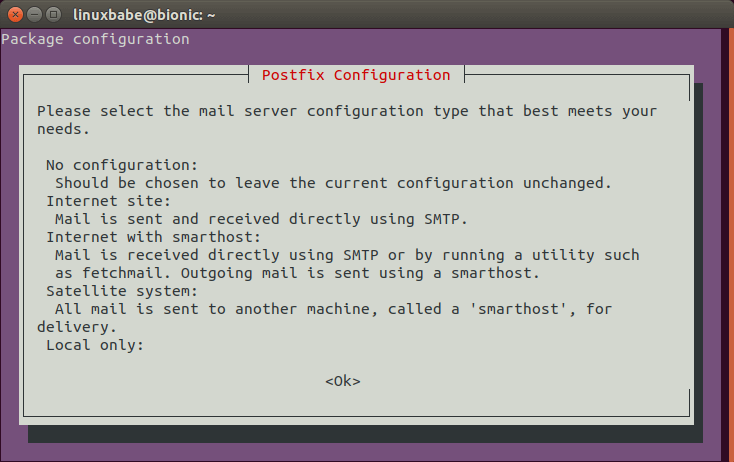
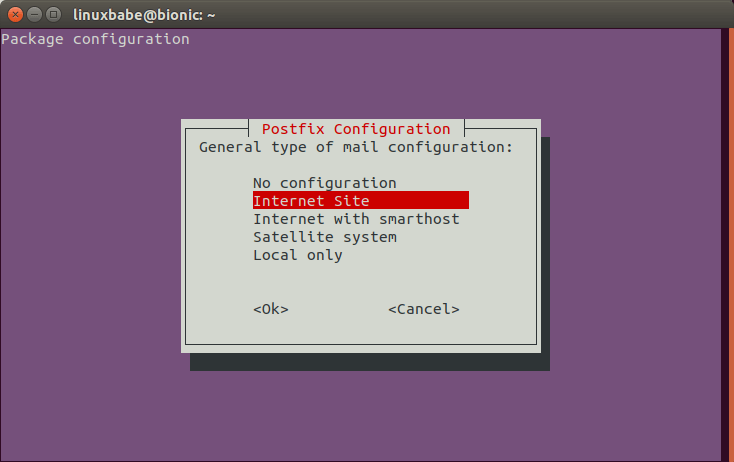
During the Postfix installation, you will be asked for the type of
mail configuration. Select ‘Internet Site’ and click on OK to continue.
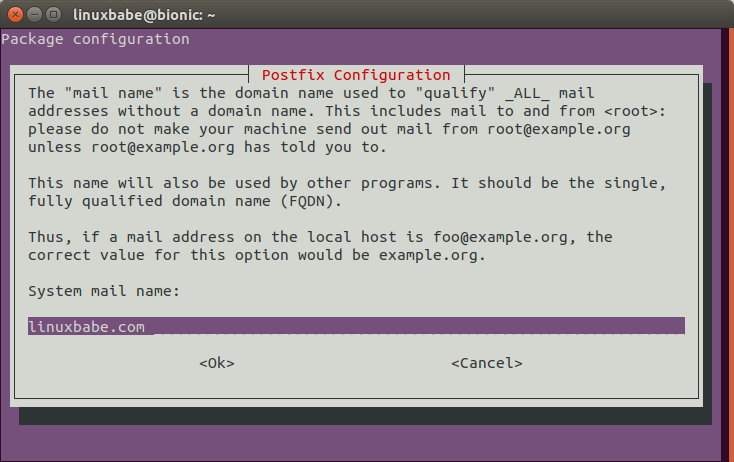
Then, enter the server’s hostname in the ‘system mail name’ field.
Once the Postfix installation is complete, we have to create several
Postfix configuration files. This will take a while as there are quite a
few files that have to be made and configured.
mkdir -p /etc/postfix/sql/
Define the database connection settings for querying the virtual alias domain catchall maps by creating this file. We’re using vi, but you can use any text editor that you prefer:
vi /etc/postfix/sql/mysql_virtual_alias_domain_catchall_maps.cf
Once the file is created, insert these contents:
user = postfixadmin
password = Strong_Password
hosts = localhost
dbname = postfixadmin
query = SELECT goto FROM alias,alias_domain WHERE alias_domain.alias_domain = '%d' and alias.address = CONCAT('@', alias_domain.target_domain) AND alias.active = 1 AND alias_domain.active='1'
Create this file so we can set the database connection settings for querying the virtual alias domain mailbox maps:
vi /etc/postfix/sql/mysql_virtual_alias_domain_mailbox_maps.cf
Then insert these contents:
user = postfixadmin
password = Strong_Password
hosts = localhost
dbname = postfixadmin
query = SELECT maildir FROM mailbox,alias_domain WHERE alias_domain.alias_domain = '%d' and mailbox.username = CONCAT('%u', '@', alias_domain.target_domain) AND mailbox.active = 1 AND alias_domain.active='1'
After that, define the database connection settings for querying the virtual alias domain maps by creating this file:
vi /etc/postfix/sql/mysql_virtual_alias_domain_maps.cf
Add the following:
user = postfixadmin
password = Strong_Password
hosts = localhost
dbname = postfixadmin
query = SELECT goto FROM alias,alias_domain WHERE alias_domain.alias_domain = '%d' and alias.address = CONCAT('%u', '@', alias_domain.target_domain) AND alias.active = 1 AND alias_domain.active='1'
The next settings are for the database connection settings for querying the virtual alias maps. Create this file:
vi /etc/postfix/sql/mysql_virtual_alias_maps.cf
Add this text:
user = postfixadmin
password = Strong_Password
hosts = localhost
dbname = postfixadmin
query = SELECT goto FROM alias WHERE address='%s' AND active = '1'
There are a few more to go. Now, create a file for the database connection settings for querying the virtual domain maps:
vi /etc/postfix/sql/mysql_virtual_domains_maps.cf
Make sure you set the passwords on all of these files that you have been adding. Add the contents:
user = postfixadmin
password = Strong_Password
hosts = localhost
dbname = postfixadmin
query = SELECT domain FROM domain WHERE domain='%s' AND active = '1'
Onto the next file. Create it and add the database connection settings for querying the virtual mailbox limit maps:
vi /etc/postfix/sql/mysql_virtual_mailbox_limit_maps.cf
Insert this and change the password:
user = postfixadmin
password = Strong_Password
hosts = localhost
dbname = postfixadmin
query = SELECT quota FROM mailbox WHERE username='%s' AND active = '1'
Finally, create this file and add the database connection settings for querying the virtual mailbox maps:
vi /etc/postfix/sql/mysql_virtual_mailbox_maps.cf
user = postfixadmin
password = Strong_Password
hosts = localhost
dbname = postfixadmin
query = SELECT maildir FROM mailbox WHERE username='%s' AND active = '1'
NOTE: Do not forget to replace ‘Strong_Password‘ with your own password in all of the configuration files above.
Modify the main.cf Postfix configuration file, which is the core of the Postfix configuration. Run these commands to edit each setting:
We can also install Certbot, then install a new Let’s encrypt SSL certificate for the server hostname and replace /etc/ssl/certs/ssl-cert-snakeoil.pem and /etc/ssl/private/ssl-cert-snakeoil.key with the newly created SSL certificate and public key files.
Then, edit the the master.cf Postfix configuration file, and modify it as follows:
vi /etc/postfix/master.cf
Add or change the contents so that the file looks like this:
Dovecot is a Mail Delivery Agent which allows a user to receive
emails in complete security through IMAP and/or POP3 protocols. We can
install Dovecot and the dovecot-mysql package using the command below:
Then edit the dovecot-sql.conf.ext file, and add these lines:
vi /etc/dovecot/dovecot-sql.conf.ext
driver = mysql
connect = host=localhost dbname=postfixadmin user=postfixadmin password=Strong_Password
default_pass_scheme = MD5-CRYPT
password_query = SELECT username as user, password, '/var/vmail/%d/%n' as userdb_home, 'maildir:/var/vmail/%d/%n' as userdb_mail, 150 as userdb_uid, 8 as userdb_gid FROM mailbox WHERE username = '%u' AND active = '1'
user_query = SELECT '/var/vmail/%d/%u' as home, 'maildir:/var/vmail/%d/%u' as mail, 150 AS uid, 8 AS gid, concat('dirsize:storage=', quota) AS quota FROM mailbox WHERE username = '%u' AND active = '1'
Do not forget to replace Strong_Password with the actual password that you set previously in Step 4 when creating the MariaDB user.
Edit the /etc/dovecot/conf.d/10-ssl.conf file, and enable SSL support:
vi /etc/dovecot/conf.d/10-ssl.conf
ssl = yes
Save and close that file, then edit the /etc/dovecot/conf.d/15-lda.conf file and set the postmaster_address email address.
vi /etc/dovecot/conf.d/15-lda.conf
postmaster_address = postmaster@yourdomain.com
Make sure that you change yourdomain.com to the actual domain name that points to your server.
Edit the /etc/dovecot/conf.d/10-master.conf file, find the service lmtp section and replace it with the following lines:
vi /etc/dovecot/conf.d/10-master.conf
service lmtp {
     unix_listener /var/spool/postfix/private/dovecot-lmtp {
     mode = 0600
     user = postfix
     group = postfix
     }
}
Once that part is edited, find the service auth section and replace it with the following snippet:
service auth {
     unix_listener /var/spool/postfix/private/auth {
     mode = 0666
     user = postfix
     group = postfix
}

unix_listener auth-userdb {
     mode = 0600
     user = vmail

}
user = dovecot
}
Then change the service auth-worker section to the following:
service auth-worker {
user = vmail
}
Save and close the file.
Set the correct permissions of the Dovecot configuration files:
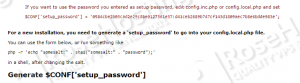
Replace the hash shown in the example with the one generated for your instance.
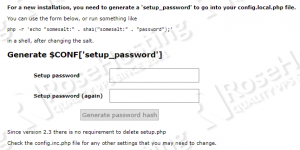
Save the config.local.php file, open the setup page once
again and create a PostfixAdmin admin user account. The setup password
in that page is the same password you used in the previous step, so fill
the other required fields such as the admin email address and password,
then click on the ‘Add admin’ button.
That’s it! The PostfixAdmin installation is complete.
Open http://your_server_IP/postfixadmin/login.php in your preferred web browser. You’ll see the login page:
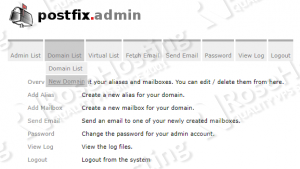
Log in as the admin user and add the domains hosted on the server:
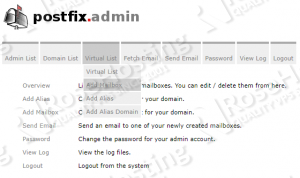
Once you do that, then you can create email addresses, set a mail quota, and so on:
That is everything you’ll need to install, configure, and start using your PostfixAdmin install on your Ubuntu 20.04 VPS.
This
install process is very involved and is quite easy to mess up and end
up with a botched install of Postfix, Dovecot, or both. However, if you
have a Managed Ubuntu VPS hosting
with us, you won’t need to do anything more than ask us to install it
for you, Our team of support experts will completely install and
configure all aspects of your server so that Postfix, Dovecot, and
PostfixAdmin all work flawlessly. They can also help set up routine
maintenance and optimize your server to maximize its speed.
We would appreciate you sharing this on social media if you found
this tutorial useful. Or, you can write a comment letting us know how
the install went, and if PostfixAdmin helped you manage your mail server
more easily. Thanks!
In this article, I will show you how to set up Postfix as a send-only
SMTP server on Ubuntu 20.04, 18.04, 16.04. I will first show you how to
do it for a single domain, then you can apply the steps for multiple
domains if you need to.
Use Case
You have a website/web application that needs to send transactional
emails to users (such as password-reset email). Most likely, there’s no
need for users to reply to these emails, or if they reply, the reply
emails will be sent to your dedicated mail server. In this case, you can
set up a send-only SMTP server on the web server using Postfix, which
is a popular SMTP server software.
Prerequisites
In order to send emails from your server, port 25 (outbound) must be open. Many ISPs and hosting companies such as DigitalOcean block port 25 to control spam. I recommend using ScalaHosting,
because it doesn’t block port 25 (outbound). Once you have a
ScalaHosting server, install Ubuntu on it and follow the instructions
below.
Setting up Postfix send-only SMTP server for multiple domains isn’t
difficult actually. First, we need to configure it for one domain, then
set it up for multiple domains.
Step 1: Install Postfix on Ubuntu
Run the following commands to install Postfix from the default Ubuntu repository.
You will be asked to choose a mail server configuration type. Press the Tab key, then press Enter.
In the next screen, press Enter to select the default option: Internet Site.
Next, enter your domain name for the system mail name, i.e. the domain name after @ symbol.
Step 2: Configure Postfix
Setting the Postfix hostname
By default, Postfix SMTP server uses the OS’s hostname to identify
itself when communicating with other SMTP server. However, the OS
hostname might change, and some SMTP servers will reject your email if
your hostname isn’t valid. So it’s a good practice to set the hostname
directly in Postfix configuration file with the following command.
This hostname should have a DNS A record pointing to the IP address of your server.
Setting $mydomain Parameter
The $mydomain parameter specifies the local internet domain name. The default is to use $myhostname minus the first component. You can display the current value of $mydomain with:
postconf mydomain
It should be your apex domain name, like
linuxbabe.com
If it’s not displaying your apex domain name, then set the $mydomain parameter with:
sudo postconf -e "mydomain = yourdomain.com"
Setting $myorigin Parameter
The $myorigin parameter specifies the default domain
name that is appended to sender and recipient addresses that have no
@domain part. The default is to use the value of in the /etc/mailname file, as can be seen with:
postconf myorigin
Output:
myorigin = /etc/mailname
Then you can display the value in the /etc/mailname file.
cat /etc/mailname
Its value should be yourdomain.com without any subdomain.
echo "yourdomain.com" | sudo tee /etc/mailname
Restarting Postfix
Finally, we need to restart Postfix for the changes to take effect.
sudo systemctl restart postfix
Step 3: Set PTR Record
You need to set a PTR record (aka, pointer record), which maps an IP
address to an FQDN. It’s the counterpart to the A record. Many SMTP
server will reject your email if your server’s IP address doesn’t have
PTR record.
Because you get IP address from your hosting provider or ISP, not
from your domain registrar, so you must set PTR record for your IP in
the control panel of your hosting provider, or ask your ISP. For
example, in ScalaHosting,
you can set PTR record by opening a support ticket or use the live chat
on their website. Although you can set PTR record to any hostname, for
best practice, you should use the Postfix hostname in step 2
To see if your PTR record is set properly, run the following command. Replace 12.34.56.78 with your own IP address.
host 12.34.56.78
Note that if your server uses IPv6 address, it’s also a good idea to
add AAAA record for your Postfix hostname and set PTR record for your
IPv6 address.
Step 4: Install and Configure OpenDKIM
DKIM stands for DomainKeys Identified Mail. You can install OpenDKIM
on your server and use it to add signatures to emails sent from your
domain, with your private key. Receiving SMTP servers verify the
signature by using the corresponding public key, which is published by
you in the DNS. Adding DKIM signature is a must if you want your emails
get into recipient’s inbox.
First install OpenDKIM from the default Ubuntu repository.
sudo apt-get install opendkim opendkim-tools
Then add postfix user to opendkim group.
sudo adduser postfix opendkim
Edit OpenDKIM main configuration file.
sudo nano /etc/opendkim.conf
Find the following lines.
#Canonicalization     simple
#Mode                 sv
#SubDomains           no
Uncomment them and replace simple with relaxed/simple. Change the mode from sv to s, because there’s no inbound email to verify signature.
Canonicalization     relaxed/simple
Mode                 s
SubDomains           no
Add the following lines at the end of this file. (On Ubuntu 18.04, the UserID is already set to opendkim)
#OpenDKIM user
# Remember to add user postfix to group opendkim
UserID             opendkim

# Map domains in From addresses to keys used to sign messages
KeyTable           refile:/etc/opendkim/key.table
SigningTable       refile:/etc/opendkim/signing.table

# A set of internal hosts whose mail should be signed
InternalHosts       /etc/opendkim/trusted.hosts
Save and close the file.
Create Signing Table, key Table and Trusted Hosts File
Add the following line to the file. This means that if the From: header in an email contains example.com, then use the sendonly DKIM selector. You can change sendonly to your preferred DKIM selector name and it should be unique in your DNS.
*@example.com sendonly._domainkey.example.com
Save and close the file. Then create the key table.
sudo nano /etc/opendkim/key.table
Add the following line. This means that for the sendonly DKIM selector, use the private key saved in /etc/opendkim/keys/example.com/sendonly.private to sign the email.
Save and close the file. Next, create the trusted hosts file.
sudo nano /etc/opendkim/trusted.hosts
Add the following lines to the newly created file.
127.0.0.1
localhost

*.example.com
The above means that messages coming from the above IP addresses and domains will be trusted and signed.
Generate Private/Public Keypair
We need to generate a private key to sign outgoing emails and a
public key for receiving SMTP servers to verify the DKIM signature.
Public key will be published in DNS.
The above command will create 2048 bits keys. -d (domain) specifies the domain. -D (directory) specifies the directory where the keys will be stored and we use sendonly as the selector (-s). Once the command is executed, the private key will be saved in sendonly.private and sendonly.txt will be the TXT record that contains public key.
The string after the p parameter is the public key. In your DNS manager, create a TXT record for the second domain. Enter sendonly._domainkey
in the Name field. Copy everything in the parentheses and paste into
the value field. Delete all double quotes. (You can paste it into a text
editor first, delete all double quotes, the copy it to your DNS
manager. Your DNS manager may require you to delete other invalid
characters, such as carriage return.)
Once the DNS record is published, enter the following command on your Ubuntu server to test your key.
If you see key not secure message, don’t panic. This is because DNSSEC isn’t enabled on your domain name.
Step 5: Connect Postfix with OpenDKIM
Postfix can talk to OpenDKIM via a Unix socket file. The default socket file used by OpenDKIM is /var/run/opendkim/opendkim.sock, as shown in /etc/opendkim.conf
file. But the postfix SMTP daemon shipped with Ubuntu runs in a chroot
jail, which means the SMTP daemon resolves all filenames relative to the
Postfix queue directory (/var/spool/postfix). So we need to change the socket file.
Edit the OpenDKIM main configuration file.
sudo nano /etc/opendkim.conf
Find the following line:
Socket local:/var/run/opendkim/opendkim.sock
Replace it with the following line. (If you can’t find the above line, then add the following line.)
Save and close the file. Restart OpenDKIM and Postfix.
sudo systemctl restart opendkim postfix
OpenDKIM won’t produce any message if it fails to restart. Run the
following command to check its status. Make sure it’s running.
systemctl status opendkim
Step 6: Create SPF DNS Record
SPF (Sender Policy Framework) record specifies which
hosts or IP addresses are allowed to send emails on behalf of a domain.
In your DNS management interface, create a new TXT record like below.
Use your own IPv4 address and IPv6 address of your server.
Step 7: Set the From Address, From Name and Return-Path
You can set custom From address, From name and Return-Path in your
website/web application. Let’s use WordPress as an example. You can add
the following lines in your WordPress theme’s functions.php file to override the default From address, From name and return-path. Replace the red text as necessary.
// Function to change From email address
function wpb_sender_email( $original_email_address ) {
    return 'notifications@linuxbabe.com';
}

// Function to change sender name
function wpb_sender_name( $original_email_from ) {
    return 'LinuxBabe';
}

// Set return-path the same as From address
function fix_my_email_return_path( $phpmailer ) {
    $phpmailer->Sender = $phpmailer->From;
}

// Hooking up our functions to WordPress filters
add_filter( 'wp_mail_from', 'wpb_sender_email' );
add_filter( 'wp_mail_from_name', 'wpb_sender_name' );
add_action( 'phpmailer_init', 'fix_my_email_return_path' );
Save the file and you are done. (Be careful about the functions.php file. Do not add an empty line after ?> at the end of this file, or your WordPress XML sitemap can be corrupted.)
Step 8: Enable TLS Encryption for Outgoing Emails
By default, Postfix doesn’t use TLS encryption when sending outgoing emails. To enable TLS encryption, open the /etc/postfix/main.cf file and add the following two lines at the end of this file.
smtp_tls_security_level = may
smtp_tls_loglevel = 1
The first line enables TLS encryption for the Postfix SMTP client. The second line will log the TLS connection in /var/log/mail.log file, so you can check if TLS encryption is working. Save and close the file. Restart Postfix for the changes to take effect.
sudo systemctl restart postfix
Since Postfix doesn’t receive incoming emails, there’s no need to configure a valid TLS certificate for the Postfix SMTP daemon.
Some SMTP servers require you to use TLS. If not, they will reject
your emails and you will see the following error message in the mail
log.
Must issue a STARTTLS command first
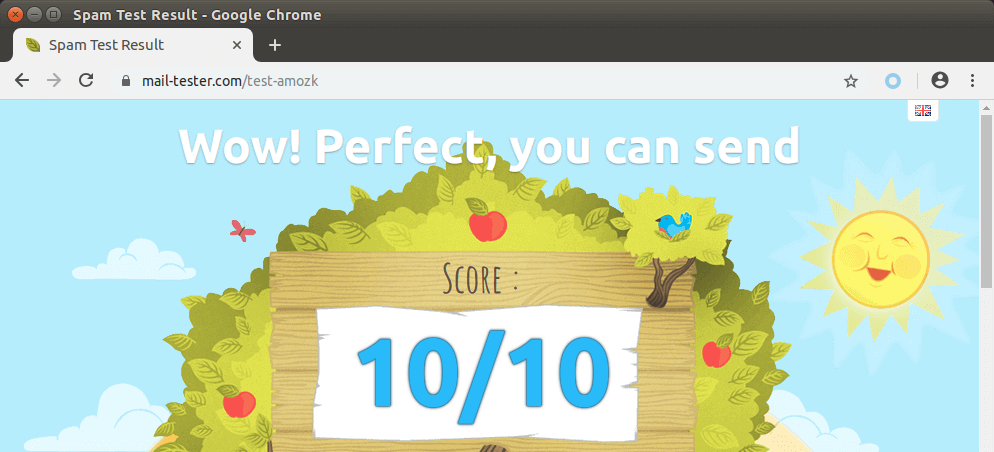
Step 9: Testing Sender Score
Now go to https://www.mail-tester.com.
You will see a unique email address. Send an email from your website on
the Postfix SMTP server to this address and then check your score. As
you can see, I got a perfect score. In the test result, you should check
if your PTR record, SPF and DKIM record is valid.
You can also open the /var/log/mail.log file to check if TLS encryption is used. For example, the following line shows the connection to mail-tester.com is encrypted.
Anonymous TLS connection established to mail-tester.com[94.23.206.89]:25: TLSv1.2 with cipher ADH-AES256-GCM-SHA384 (256/256 bits)
What if Your Emails Are Still Being Marked as Spam?
I have more tips on email deliverability for you in this article: How to stop your emails being marked as spam. Although it will take some time and effort, your emails will eventually be placed in the inbox after applying these tips.
How to Configure Postfix Send-only SMTP Server For Multiple Domains
By default, Postfix allows you to use any domain name in the From
header and return path address to send outgoing emails. If your server
hosts multiple websites, you just need to create SPF DNS record for your
other domains, which is very easy to do, and configure OpenDKIM for
your other domains.
To configure OpenDKIM for other domains, you need to add the other
domains in the signing table, key table and trusted hosts file like
below.
Then generate the DKIM Private/Public keypair
by following the same steps as mentioned above for other domains and
add the DKIM public key in DNS. Restart OpenDKIM and you are done. Don’t
forget to test your sender score.
Sending Emails From Another Server
There are two ways to allow other servers to send emails through your send-only Postfix SMTP server.
Use port 25 without SMTP authentication: This method requires the other server doesn’t block port 25 (outbound).
Use port 587 with SMTP authentication: If the other server blocks port 25 (outbound), you can use port 587.
Port 25 without SMTP Authentication
Run the following command to make Postfix listen on 0.0.0.0, so other servers can connect to the send-only Postfix SMTP server.
sudo postconf "inet_interfaces = all"
Then you need to add the IP address of the other server to the Postfix mynetworks parameter. Replace 12.34.56.78 with the real IP address.
Run the following commands to open port 25 (inbound) for the other server.
sudo ufw insert 1 allow in from 12.34.56.78 to any port 25 proto tcp
Now you can configure SMTP clients to use mta1.yourdomain.com and port 25 to send emails. You don’t need to specify username/password in the SMTP client.
Port 587 with SMTP Authentication
Open port 587 and 80 in firewall.
sudo ufw insert 1 allow in from 12.34.56.78 to any port 25 proto tcp
sudo ufw allow 80/tcp
Run the following command to make Postfix listen on 0.0.0.0, so other servers can connect to the send-only Postfix SMTP server.
sudo postconf "inet_interfaces = all"
Then you need to enable the submission service of Postfix so that the
email client can submit emails to Postfix SMTP server. Edit the master.cf file.
sudo nano /etc/postfix/master.cf
In submission section, uncomment or add the following lines. Please allow at least one whitespace (tab or spacebar) before -o.
In postfix configurations, a preceding whitespace character means that
this line is continuation of the previous line. (By default the submission
section is commented out. You can copy the following lines and paste
them into the file, so you don’t have to manually uncomment or add new
text.)
The above configuration enables the submission
daemon of Postfix and requires TLS encryption. Plain text authentication
will be rejected. The submission daemon listens on TCP port 587. STARTTLS is used to encrypt communications between SMTP client and the submission daemon.
Save and close the file. To enable SMTP authentication, we need to install Dovecot.
sudo apt install dovecot-core
Edit the authentication config file.
sudo nano /etc/dovecot/conf.d/10-auth.conf
Uncomment the following line.
disable_plaintext_auth = yes
It will disable plaintext authentication when there’s no SSL/TLS encryption. And if you want to use full email address (username@your-domain.com) to login, add the following line in the file.
auth_username_format = %Ln
Otherwise, you are able to login with username only (without @your-domain.com). Next, find the following line.
auth_mechanisms = plain
This line only enables the PLAIN authentication mechanism. LOGIN is
another authentication mechanism you probably want to add to support
older email clients.
auth_mechanisms = plain login
Save and close the file. Then edit the following file.
sudo nano /etc/dovecot/conf.d/10-master.conf
Change service auth section to the following so that Postfix can find the Dovecot authentication server.
service auth {
    unix_listener /var/spool/postfix/private/auth {
      mode = 0660
      user = postfix
      group = postfix
    }
}
Save and close the file. Restart Dovecot for the changes to take effect.
sudo systemctl restart dovecot
Next, we need to obtain a valid TLS certificate. We can easily obtain
a free TLS certificate from Let’s Encrypt. Issue the following commands
to install Let’s Encrypt client (certbot) on Ubuntu.
sudo apt install certbot
Then use the standalone plugin to obtain TLS certificate (assuming there’s no web server running on the Postfix SMTP server).
After a while, you should see the following lines which means the
certificate is successfully obtained. You can also see the directory
under which your cert is stored.
Next, we need to run the following two commands to specify the
location of TLS certificate and private key in Postfix configuration
file. Your Let’s Encrypt certificate and private key are stored under /etc/letsencrypt/live/sendonly.your-domain.com/ directory.
Now you can configure SMTP clients to use sendonly.yourdomain.com and port 587 to send emails. Use TLS encryption type and plain as authentication mode. You need to create email account on the SMTP server. That’s very simple. Use the adduser command to add a user.
sudo adduser user1 --no-create-home
Then set a password for this user.
sudo passwd user1
The email address will be user1@yourdomain.com.
Troubleshooting
Email not Signed by DKIM
If your message is not signed and DKIM check failed, you may want to check postfix log (/var/log/mail.log) to see what’s wrong in your configuration. If you see the following message in the mail log,
warning: connect to Milter service local:opendkim/opendkim.sock: No such file or directory
you may want to check if the opendkim systemd service is actually running.
systemctl status opendkim
If opendkim is running and you still see the above error, you might need to change smtpd_milters = local:opendkim/opendkim.sock to smtpd_milters = local:/opendkim/opendkim.sock in /etc/postfix/main.cf file.
Must Issue a STARTTLS Command First
If you see the following error in the mail log (/var/log/mail.log), it’s probably because the TLS certificate is not specified correctly in /etc/postfix/main.cf file.
Must issue a STARTTLS command first (in reply to MAIL FROM command))
fatal: no SASL authentication mechanisms
If you see the following error in the mail log (/var/log/mail.log), it’s probably because you forgot to restart dovecot (sudo systemctl restart dovecot).
warning: SASL: Connect to private/auth failed: No such file or directory
fatal: no SASL authentication mechanisms
Also, check if Dovecot is running.
sudo systemctl status dovecot
Sending Bulk or Mass Emails
Can you use this SMTP server to send bulk or mass emails?
Yes, but you should send bulk email to legitimate subscribers only,
that is to say, the recipients should have signed up for your mailing
list. You should never send spam (unsolicited bulk email), or you SMTP
server will surely be blacklisted. Before sending bulk email, I highly
recommended following the advice in this article: How to Stop Your Emails Being Marked as Spam.
Disable Receiving Email in Postfix
By default, Postfix SMTP server listens on all active interfaces on
the machine. Since the Postfix SMTP server is only used for sending
transactional emails to users, you can block inbound connection to TCP
port 25, so bad actors can’t send spam to it. Since we added the a
whitelist for port 25, legitimate users won’t be affected.
Removing Sensitive Information from Email Headers
By default, Postfix SMTP server will add a Received:
email header, recording the IP address of the client, which can leak the
IP address of your website (If it’s behind CDN). You can tell Postfix
to ignore it. Create a header check file.
sudo nano /etc/postfix/smtp_header_checks
Put the following lines into the file.
/^Received:/ IGNORE
Save and close the file. Then edit the Postfix main configuration file.
Save and close the file. Then run the following command to rebuild hash table.
sudo postmap /etc/postfix/smtp_header_checks
Reload Postfix for the change to take effect.
sudo systemctl reload postfix
Now Postfix won’t include that sensitive information in email headers.
Auto-Renew TLS Certificate
You can create Cron job to automatically renew TLS certificate. Simply open root user’s crontab file.
sudo crontab -e
Then add the following line.
@daily certbot renew --quiet
Save and close the file.
Conclusion
I hope this tutorial helped you set up a Postfix send-only SMTP
server on Ubuntu for multiple domains. As always, if you found this post
useful, then subscribe to our free newsletter to get more tips and tricks. Take care 🙂
The backup MX host must accept and queue mails, if the primary mailhost is down for a certain domain. To have a high degree of availability the backup MX host must be located outside the backed up domain. You can setup the backup MX host as a primary or secondary mx for a remote site.
The primary mailhost is down ...
Email is delivered to the backup MX host and queued there ....
After the primary mailhost is up and running again, email is delivered from the backup MX host to the primary mailhost and stored in the local mailboxes.
Setup of a primary mx host for a remote site
IN MX 10 mail1.backup1.com. IN MX 20 mail2.backup2.com.
All email for the remote site is delivered to the primary mx host: mail1.backup1.com.
Postfix is a popular open-source Mail Transfer Agent (MTA) that can be used to route and deliver email on a Linux system. It is estimated that around 25% of public mail servers on the internet run Postfix.
In this guide, we’ll teach you how to get up and running quickly with Postfix on an Ubuntu 16.04 server.
In the “transport” file set up each domain and where it should be relayed. This file is also used for the “relay_domains” parameter that will only read the first column.
# /etc/postfix/transport
# run  "postmap  /etc/postfix/transport"  after each edit

example.com    smtp:mail.example.com:25
List all recipients that should be relayed in the “relay_recipients” file. Easiest is to simply list a domain and accept all addresses for it.
By instead specifying each real address the mail relay server can discard mail to non existing users directly. Then the list will however need to be updated when you add/remove addresses/mailboxes on your mail server.
# /etc/postfix/relay_recipients
# run  "postmap  /etc/postfix/relay_recipients"  after each edit

@example.com        OK

info@example.com    OK
joe@example.com     OK
Some other good settings include the maximum message size that I set to 25 MB, same as Gmail. The queue lifetime decides how long the server will keep trying to send mail. I set this to 10 days, this gives ample time to get a mail server up and running again.
I got good workaround for balancing smtp outgoing from postfix mailing list archives(not using expensive real load balancer). suppose we have 4 smtp servers for outgoing email, and we need to configure/load balance like this:
In this article, we will show you how to setup and configure a mail server with PostfixAdmin, Postfix, Dovecot and SQLite on a CentOS VPS. PostfixAdmin is a PHP-based web front-end that allows you to manage virtual domains and users for a Postfix mail transport agent. This guide should work on other Linux VPS systems as well but was tested and written for a CentOS 7 VPS.
Geçtiğimiz günlerde kurduğum bir sunucu uyarı emaillerini göndermeyince meraklanıp sistemi kontrol ettim. Sistem gayet güzel çalışmakla beraber mail loglarını inceleyince Türk telekom’un 25. portu kapatıp 587 üzerinden email trafiğine izin verdiğini hatırladım. Kurduğum sunucu varsayılan olarak Postfix sunucu kullanmakta. Postfix’de bildiğiniz üzere Sendmail’e birebir uyumlu, fakat birçok noktada daha üstün olan bir sunucu yazılımı.
Posta sunucunuz kendisine bırakılan e-postanın nihayi dağıtımı kendi üzerinde değilse dağıtımını iki farklı şekilde yapabilir. E-postayı ya doğrudan alıcının posta sunucusuna bırakmaya çalışır yada relayhost kullanarak e-postanın dağıtımını servis sağlayıcısının posta sunucusuna bırakır.
Eğer domainize ait MX kaydı sunucunuzu yönettiğiniz posta sunucusunu göstermiyorsa, sunucunuz ikinci dağıtım yolunu kullanarak dağıtım yapmalıdır. Aksi taktirde alıcının posta sunucusu MX kayıtlarınızda yer alan IP adresiyle, kendisiyle bağlantı kuran sunucunun IP adresinin aynı olmadığını görecek ve bağlantıyı geri çevirecektir.


 PostfixAdmin
is an open-source web-based application written in PHP that’s used to
create virtual domains and email accounts for a
PostfixAdmin
is an open-source web-based application written in PHP that’s used to
create virtual domains and email accounts for a 

 That is everything you’ll need to install, configure, and start using your PostfixAdmin install on your Ubuntu 20.04 VPS.
 This
install process is very involved and is quite easy to mess up and end
up with a botched install of Postfix, Dovecot, or both. However, if you
have a
This
install process is very involved and is quite easy to mess up and end
up with a botched install of Postfix, Dovecot, or both. However, if you
have a